

Natural Everyday Makeup Tutorial for Beginners
Everyday Makeup tutorial for beginners is one of the most useful articles a beauty site can offer — it opens the door for readers who feel intimidated by products and techniques. This guide breaks everything down into small, repeatable steps, recommends beginner-friendly products, and gives quick variations for different skin tones and occasions (office, date, casual). The goal: a natural, polished look you can do quickly and confidently.
Makeup tutorials are widely searched online — the topic draws huge monthly interest, so a clear, step-by-step article with images or a short embedded video will attract both traffic and engagement.
Why a Simple Everyday Makeup Routine Works
A beginner routine should prioritize simplicity, skin health, and natural finish. Instead of masking your face, the aim is to enhance features. For daily wear, people want something fast, flattering under daylight and office lighting, and easy to remove.
Most successful tutorials follow this pattern: prep skin → base (light coverage) → eyes (soft definition) → cheeks (healthy flush) → lips (natural color) → set. Tutorials and short videos demonstrating this sequence are hugely popular on platforms like YouTube and short-form video channels. Including a short clip or step images in your post increases time on page and shareability.
Basic Products Every Beginner Needs
Start small. Here’s a compact kit that covers the essentials without overwhelming a beginner.
| Product | Purpose | Beginner Tip |
| Cleanser + moisturizer | Skin prep | Keep consistent — hydrated skin makes makeup blend better |
| Tinted moisturizer / BB cream / light foundation | Light coverage base | Less is more — build coverage where needed |
| Concealer | Spot correction & under-eye | Use a shade one step lighter for under-eyes |
| Neutral eyeshadow palette (2–3 shades) | Soft eye definition | Matte + shimmer combo works best |
| Brown/black mascara | Open the eyes | Wiggle at roots for volume |
| Brow pencil or powder | Shape brows | Use light, hair-like strokes |
| Cream blush or stick | Natural flush | Warm cheekbones, blend with fingers |
| Bronzer (optional) | Warmth & subtle contour | Use a light hand |
| Lip balm / tinted lip balm / cream lipstick | Finish | Choose a wearable tone |
| Setting powder / spray (optional) | Longevity | Light dusting or mist |
(Keep prices and brands flexible — recommend 1 drugstore + 1 mid-range for each item so readers with any budget can follow.)
Step-by-Step: Easy Everyday Makeup Tutorial for Beginners
This section is the core. Each step includes quick technique notes so readers can follow and practice.
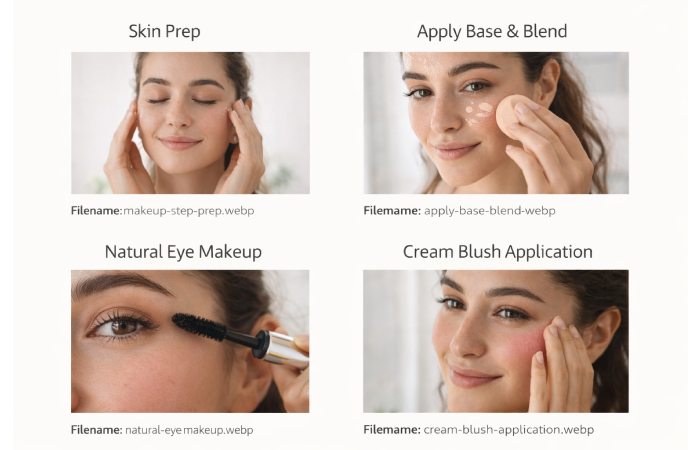
step-by-step makeup application routine for beginners
Step 1 — Prep your skin (2–3 minutes)
Prep is non-negotiable. Clean, hydrated skin ensures a smooth, natural finish.
- Cleanse with a gentle, non-stripping cleanser to remove oils or sweat.
- Apply a lightweight moisturizer or gel with hyaluronic acid (wait ~60 seconds to absorb).
- If you use primer and have time, apply a small amount only in areas you want to smooth (T-zone or cheeks).
Good skin prep reduces cakiness and helps tinted moisturizers and foundations blend easily. If you’re very short on time, a moisturizer with SPF or a hydrating primer + SPF combo saves a step.
Step 2 — Light base: tinted moisturizer / BB cream / light foundation (2–4 minutes)
For a natural, everyday look, choose a light-to-medium coverage base.
- Dot product on cheeks, forehead, nose, and chin.
- Blend with clean fingers, a damp sponge, or a brush in light outward strokes.
- If you need more coverage only in certain areas (redness or blemishes), use a tiny amount of concealer after foundation.
Pro tip: many MUA and beauty editors prefer foundation first then concealer for a seamless finish — it reduces the amount of concealer used and avoids over-correcting.
Step 3 — Conceal & brighten (1–2 minutes)
Target the under-eye and blemishes.
- For under-eyes: choose a concealer 1 shade lighter than your base; apply a small triangle under the eye and gently blend by tapping.
- For spots: use a small brush or fingertip to dot concealer on blemishes, press, and set lightly with powder.
Avoid dragging concealer across the skin — tapping preserves coverage and prevents creasing.
Step 4 — Brows: frame the face (1–2 minutes)
Brows transform your look quickly.
- Use a pencil or powder to fill gaps with short, hair-like strokes.
- Brush brows upward with a spoolie to blend and set with a clear or tinted brow gel.
Beginner rule: keep the brow shape soft — heavy blocky brows read as “made up.” Aim for natural hair-like strokes.
Step 5 — Eyes: neutral wash + definition (2–4 minutes)
A few simple steps lift the eyes without heavy makeup.
- Sweep a medium neutral matte shade across the lid (one shade darker than your skin tone).
- Add a slightly deeper shade at the outer corner and softly blend into the crease for dimension.
- Optionally add a small shimmer or light shade to the inner corner to brighten.
- Tightline lightly or apply a thin line of brown eyeliner for soft definition.
- Curl lashes and apply one to two coats of mascara, wiggling the wand at the base to avoid clumps.
Avoid heavy eyeliners — they can make the look dramatic rather than everyday.
Step 6 — Cheeks: cream blush for a natural glow (1 minute)
Cream blushes and multi-stick products blend beautifully and look skin-like.
- Smile and apply cream blush to the apples of the cheeks, then blend up toward the temple.
- A light dusting of translucent powder where needed prevents shine while keeping the natural dewy finish.
Warm tones like peach or rosy shades flatter most complexions; deeper berry shades work well on darker skin tones.
Step 7 — Lips: balm → tint (30 seconds)
Finish with a lip balm or tinted balm.
- Apply balm first to hydrate.
- Add a tinted balm or a creamy lipstick in a “your lips but better” shade.
Avoid extremely bold colors for an everyday “natural” look—reserve those for evenings or special events.
Step 8 — Set and go (optional, 15–30 seconds)
If you need longevity:
- Lightly set oily areas with a translucent powder (press don’t rub).
- Or use a light setting spray for a dewy finish.
That’s it — a 10–20 minute routine that looks fresh and polished.
Product Recommendations (Beginner-friendly picks)
Below is a simple product table with budget + mid-range suggestions. (Pick equivalents for local markets.)
| Category | Drugstore pick | Mid-range pick | Why it’s good for beginners |
| Tinted moisturizer | e.g., Maybelline BB | NARS Pure Radiant Tinted | Easy to blend, forgiving |
| Concealer | e.g., Maybelline Fit Me Concealer | NARS Radiant Creamy Concealer | Blendable, buildable |
| Eyeshadow palette | e.g., NYX Neutral Palette | Tartelette In Bloom | Neutral shades, easy combos |
| Mascara | e.g., Maybelline Colossal | L’Oréal Lash Paradise | Volume, length with one coat |
| Brow pencil | e.g., e.l.f Brow Pencil | Anastasia Brow Wiz | Precise, natural strokes |
| Cream blush | e.g., Glossier Cloud Paint | Milk Makeup Lip + Cheek | Skin-like finish |
| SPF | e.g., La Roche-Posay Anthelios SPF 50 | Supergoop Unseen SPF 40 | Broad spectrum, lightweight |
(Always remind readers to patch test and consider skin sensitivities.)
Variations & Tips by Skin Tone and Occasion
Office-appropriate (soft matte + longwear)
- Use a matte or semi-matte tinted base.
- Keep eyes neutral and lips muted.
- Add light waterproof mascara if you expect long hours.
Date-ready (soft glow + defined lashes)
- Add a tiny shimmer on the lid and the high point of cheekbones.
- Use a cream highlighter sparingly and a slightly brighter lip tint.
Warm skin tones
- Choose warm bronzy eyeshadows (copper, warm brown) and peachy blushes.
- Lips: warm coral or terracotta work well.
Cool skin tones
- Use taupe or cool-brown shadows and rosy blushes.
- Lips: soft berry or rose shades flatter cool undertones.
Encourage readers to try on shade swatches in natural light to find best matches.
Common Beginner Mistakes & How to Fix Them
| Mistake | Fix |
| Using too much product | Start light; layer if needed |
| Wrong foundation shade | Test along jawline in daylight |
| Heavy hand with powder | Tap and press — avoid over-powdering |
| Skipping skin prep | Cleanse + hydrate first for smoother finish |
| Clumpy mascara | Wipe excess off wand before applying |
A gentle, layered approach beats heavy application every time.
Quick Five-Minute Routine (For rush mornings)
If you have 5 minutes:
- Moisturizer with SPF or SPF + tinted balm (2 in 1)
- Brow brush + tinted brow gel
- Concealer for under-eyes/blemishes
- One coat mascara
- Cream blush dabbed with fingers
- Lip balm or tinted balm
This keeps you polished and camera-ready in the shortest time.
Why Tutorials & Videos Help (and Where to Embed One)
Many beginners learn best by watching — YouTube tutorials for “everyday makeup for beginners” regularly rack up millions of views, proving the demand for step-by-step visual guidance. Embedding a 3–7 minute “follow along” clip (either hosted on your site or via YouTube) increases dwell time and helps users replicate the look.
Also consider short 30–60 second reels or GIFs showing one step (e.g., how to blend foundation or apply cream blush) — these are highly shareable on social platforms.
Small Techniques That Make a Big Difference
- Warm product on your fingers before blending (foundation, cream blush) for a skin-like finish.
- Use a damp sponge for a more “airbrushed” base.
- Clean makeup brushes and sponges weekly to prevent breakouts.
- For a natural eye look, use brown instead of black for liner.
- Try “underpainting” (cream contour + cream blush under light base) if you want a modern, skin-like finish — it’s trending and creates a natural sculpt.
When to Use Foundation vs. Concealer First
There’s a debate among pros: apply foundation first or concealer first? For everyday natural looks, many artists recommend applying foundation first and then spot-concealing — this reduces the amount of concealer needed and gives a more seamless finish. That said, for targeted corrective work (severe under-eye darkness or color correction), applying concealer first can help. Both methods work — choose what gives the most natural result for you.
Removing Makeup & Skincare After the Day
Even a light daily makeup should be removed to prevent clogged pores and dullness.
- Use a gentle oil cleanser or micellar water to remove makeup.
- Follow with a mild cleanser and lightweight night serum or moisturizer.
- Never sleep in sunscreen or makeup — they trap pollutants and accelerate aging.
Dermatologists recommend a simple skincare routine of cleansing, moisturizing, and sun protection
FAQ
Q: How long does this everyday routine take?
A: 10–20 minutes for a full, relaxed routine; 3–5 minutes for a quick polished version.
Q: Can I substitute products for sensitive skin?
A: Yes — choose fragrance-free, non-comedogenic formulas and patch test new items.
Q: Do I need primer?
A: Not always. Primer helps smooth skin and extend wear but isn’t required. Moisturizer + sponge/fingers often gives a natural finish.
Q: How do I choose a foundation shade?
A: Test on your jawline in daylight. The right shade should disappear into your skin.
Q: Is mascara necessary?
A: Mascara opens the eyes quickly — one coat can significantly lift the look without feeling heavy.
Final Notes & Encouragement
Makeup is a skill — the more you practice, the easier it becomes. The easy everyday makeup tutorial for beginners above focuses on enhancing features, building confidence, and using minimal products. Start slowly: choose a single technique to master each week (e.g., blending foundation, applying mascara, or learning brow strokes).
Because “makeup tutorial” is a top search topic, pairing clear step-by-step text with images and a short video will make this article both useful and SEO-friendly — and will likely attract a wide beginner audience.